
Sealing The Seams – How to Waterproof Your Chest Freezer Cold Plunge
This article will cover the best practices for the products used to seal the seams of your chest freezer cold plunge, as well as how to apply them.
Why Seal the Seams of Your Chest Freezer Cold Plunge?
Chest freezers are not designed or built to hold water.
If you read through enough appliance forums, you will find that rust is a very common problem when chest freezers are being used for their intended purpose-food storage. You can probably imagine how much that potential problem increases when you fill it with water- which is not its intended purpose.
Since 2017 I have heard from thousands of people about various products to seal the seams of chest freezers. Most of which are unsuitable for long-term submersion, leach toxic chemicals, are not compatible with sanitation methods used to keep your water clean, and have no long-term track record of success.
For that reason, this post will focus on using 2-part epoxy putty and will not discuss other options for sealing, or liners, both of which are different topics.
Installing a liner-in addition to sealing the seams- is a best practice if you want your chest freezer to last long term. See this article for a comparison of the best practice liner options:
This article compares the best practice liner options:
https://chestfreezercoldplunge.com/4-liners
Regardless of whether you have a chest freezer with a white enamel or bare metal interior, sealing the seams is a best practice.
The gold-standard is using a two part epoxy putty. Two-part epoxy putties have long-term success reports of better than 95%. However, it must be done correctly in order to last long term. The 5% of failures reported happen when the instructions or best practices are not followed.
What if I Don’t Seal the Seams?
Can you do zero prep work on your chest freezer and just fill it with water? Of course you can. And a small, vocal group of people have done just that and love to point out that it is working “just fine.”
I’m glad to hear that people have a working cold plunge with no prep work, and I sincerely hope it lasts a long time for them.
I filled up my brand new Whirlpool chest freezer with much enthusiasm. After a few days to chill the water down and only a few more days of plunging, I was horrified to open the lid and find rivers of rust seeping from the seams. Here is a picture of what I found:
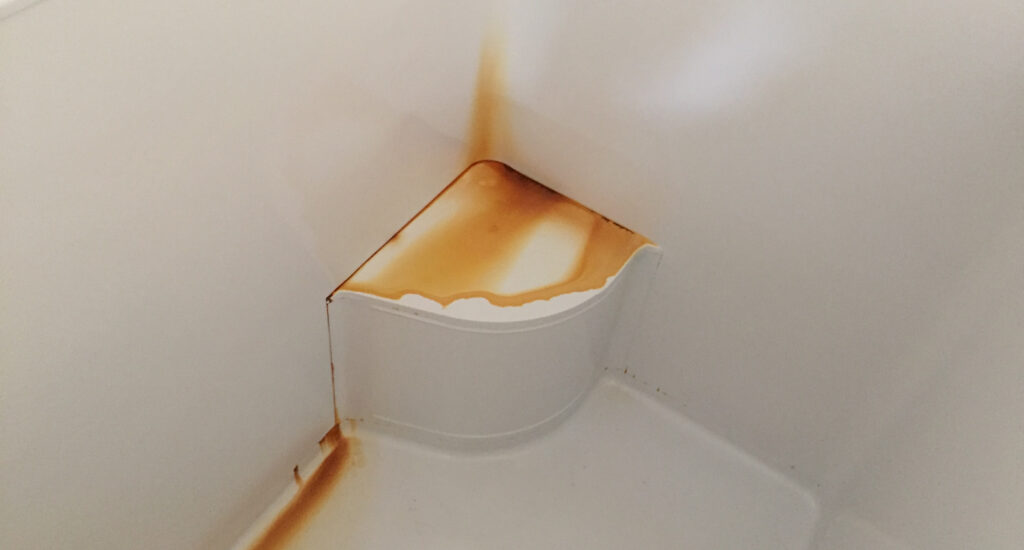
That set into motion all of my efforts to figure out how to make a chest freezer cold plunge last long term.
Since that July in 2017, I have helped tens of thousands of people worldwide convert with their DIY cold plunges, and we have learned quite a bit from this many people over the years. This kind of data is know as the Law Of Large Numbers. After countless posts, emails, messages, and conversations, here are the the failure stats if you don’t seal the seams.
– 80% within three months
– 90% within the first year
– 95% within two years
This means that roughly only 5% of the chest freezers turned into cold plunges without sealing the seams are still working after two years. If you got a great deal on a used chest freezer on don’t care about it lasting long term, then sure, you can fill it up with water a use it until it dies. Just know that day will come at that point, and for most people who do that, it will be sooner than later.
What About the Top Seam?
People frequently ask why the top seam (between the top plastic trim and inside walls of the chest freezer ) needs to be sealed, since the water level will not be that high. That’s a good question. Sealing the seam is also important.
It is possible for moisture and splashed water to get into that seam and into the interior walls, causing damage. Sealing it is important for fully waterproofing your chest freezer against damage.
Further, if you plan to use a permanent liner, such as Pond Shield or Line-X, the sealant acts as a fillet in that gap. Those coatings are not gap fillers, and having a surface to transition between the wall and trim is important for long-term durability.
The Problem with Silicone Caulk – and When it is OK to Use it
Silicone and other caulks (including marine adhesives) have pretty much the same exact failures as not sealing the seams at all. See the stats in the previous section.
Only 3 – 5% report it still working with no issues after 3 – 4 years.
If you choose to use silicone, the best practice is to use a high quality silicone and install a removable liner. If you add water directly, the odds are not in your favor.
If you want to use a silicone caulk because it is easier, the best practice is to install a removable liner. You can use a black rectangular EPDM Pond Liner, or one of the custom white PVC liners that I offer. You can find more information about my custom liners here:
https://chestfreezercoldplunge.com/customer-liners
If you plan to use Pond Shield – do not seal the seams with silicone or any other kind of caulk. Use JB Water Weld.
Products to Use
The two products that are most tested with long-term positive results are
- JB Water Weld
- Selleys Knead-It Aqua (available in Australia)
I have an Amazon affiliate link for JB Water Weld here:
3-Pack: https://amzn.to/3qbhxbW
1-Pack: https://amzn.to/3wr9qdd
We have a growing number of reports of success with All-fix, and PC-11, which are also a 2-part epoxy putty. Reports are conflicted about these products being easier and harder to work with than JB Water Weld. Here are Amazon affiliate links:
- All Fix: https://amzn.to/3gYcqqA
- PC11: https://amzn.to/3xGH3fa
Criteria for Finding A Comparable Product
Recommended products are not available in all countries. If you cannot find them, but can get a hold of a recommended product, it is worth the expense to do it right the first time.
However, if you do wish to find a product that is comparable to the ones that are well tested over time, it should meet the following criteria:
- two part epoxy putty
- suitable for potable water applications
- suitable for long-term submersion (not just “water resistant”)
- VOC-free after curing
- able to withstand whatever sanitation method you are using (chlorine, ozone, H2O2, etc.)
- Works well in the cold temperature range of your water
What to Seal
A number of people over the years have told me that their chest freezer doesn’t have seams. Upon closer inspection, they discovered that it did. Look closely and you’ll find them. Chest freezers with white enamel and bare metal interiors have seams.
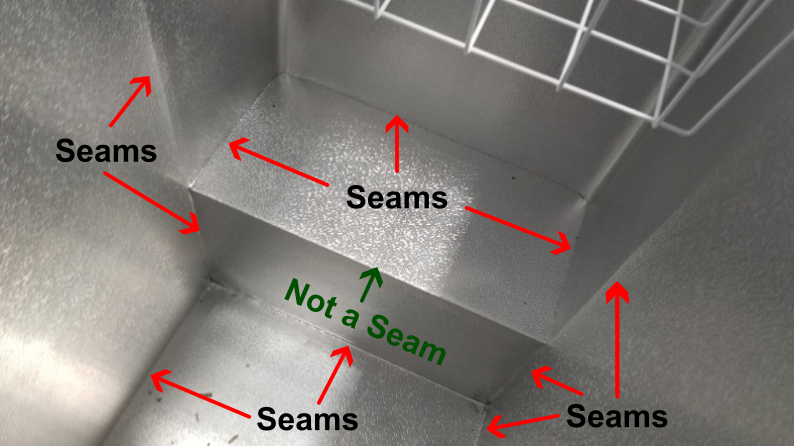
1. Two Metal Seams
Any place where two pieces of metal come together, whether they overlap, abut, or have a gap. If it is a fold in a single piece of metal it does not need to be sealed.
“Not a Seam”
The front top edge of the step over the compressor in the picture below is labeled “Not a Seam.” However, it is included for one reason: Some people have reported that after applying several coats of a 2-part epoxy resin (ex. Pond Shield) for a liner, that it cracked along this 90-degree edge. Applying a bead of putty over top and down the front edge gives the epoxy resin a broader surface to which it can adhere.
2. Metal and Plastic Seams
A. Top Trim and Upper Wall
The upper seam where the white trim meets the interior walls. If you are using a removable liner, you can use a high-quality silicone instead.

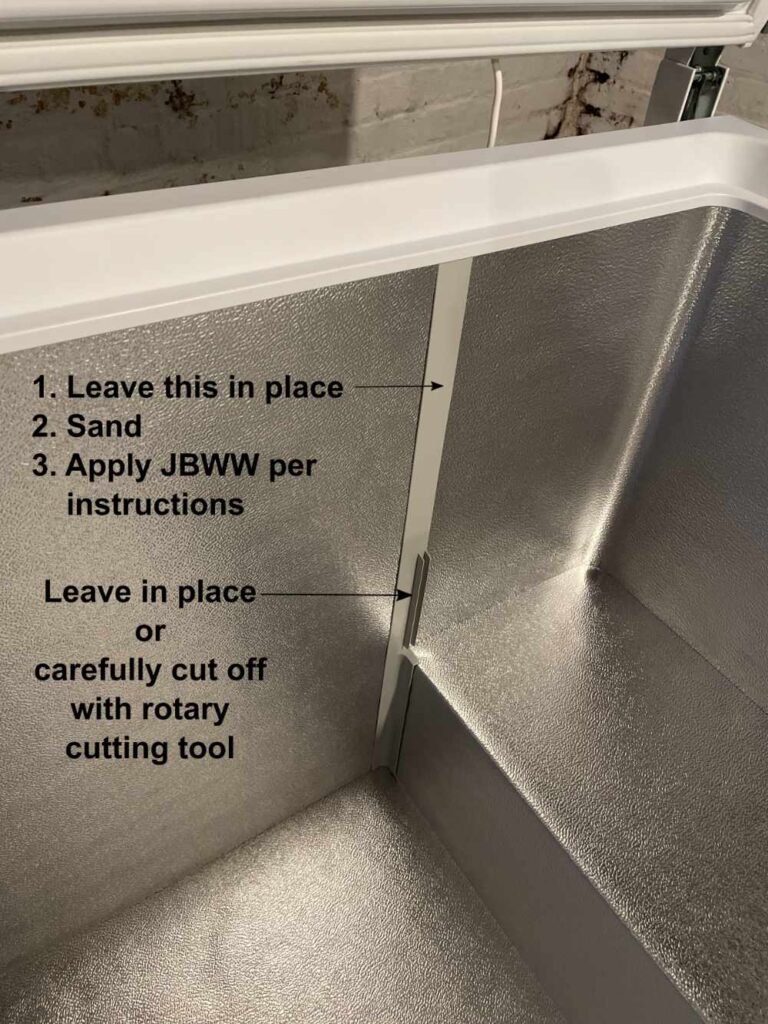
B. Plastic inserts in the vertical wall
Some chest freezers have a plastic insert in the interior wall. They can be a single flat piece for stability, or have two parts that stick out for a shelf or divider to be attached. Either way, it is best to leave them in place. Removing them risks damaging the chest freezer or creating a larger gap that must now be sealed.
If you have a flat piece, sand it and apply the putty as recommended.
If there are shelf inserts, it is best to cut off the parts that stick out into the chest freezer, leaving the piece that is parallel to the wall. You can use a sharp knife or a rotary cutting blade to remove these pieces.
3. The Drain
Yes, I know, you might want to use that drain. However, it is a major Achilles heel for your entire setup. Those drains are not waterproof and water can gradually seep into the floor or walls and kill your chest freezer. Sometimes you can see the rust forming around the drain, or water leaking out of the bottom of the chest freezer. However, it is possible for the leak to be completely inconspicuous, and the chest freezer simply dies after 1-12 months.
The INTERIOR drain (pictured below) should be sealed whether it has a plastic insert or not. Seal the drain only from the inside. Do not block the entire drain pipe. Leave the drain on the front outside wall unsealed. Why? Because if you develop a leak it, it acts like a canary in the coal mine – an early warning of a problem.
Use 1/3 to 1/2 of a tube inside the drain from the floor of the tub. Insert the drain plug or leave it off. Apply putty as directly over the plastic insert (or plug) and onto the floor.

How to drain the water after the drain is sealed
Use a submersible utility pump to drain your chest freezer 10x faster than the built in drain. I’ve tried out several over the years and am currently using this one (Amazon affiliate link):
https://amzn.to/3K33bCK
How Much Putty Do You Need?
There is a best practice for how much putty to use. If you use less than what is recommended, it might result in leaks or failure.
One 2-oz. tube of JB Water Weld should cover 16 inches of seams. Here are the details:
- 1/2 inch on each side of the seam
- 1/8- inch thick
Using more putty than this is not needed. Using less putty can result in failure. I’ve heard enough stories similar to “I used 5 tubes to seal a large chest freezer” that result in failure to know this is not a place to cut corners.
Steps to Application
1. Sand the seams to be covered
- Use 120-grit sandpaper if you plan to use a removable liner. Use 60-grit if you plan to use Pond Shield or another epoxy resin. If you plan to have a company apply Line-X or another truck bed coating professionally, let them seal the seams for you.
- Remove ALL surface rust. If the rust does not come off with sandpaper, use a wire brush attachment on a drill. There are also chemical rust remover, such as CLR that can be helpful. Wipe away all residual rust.
- You always need to sand regardless of whether or not you have a bare metal or white interior
- If you have a white interior, the white enamel does not need to be removed completely, just rough to the touch
- However, if some of the white enamel comes off, it is OK, just be sure to cover any exposed metal with epoxy putty.
2. Vacuum or wipe up the dust
a. Wipe or vacuum all of the dust
b. Wipe the surface clean with acetone or another de-greaser
4. Apply JBWW
- Wear gloves to protect your hands and skin
- Nitrile works much better than latex or vinyl
- Wear multiple layers of gloves at a time to make your work flow faster
- Remove the gloves when the putty builds up and makes it difficult to mix new putty
- Put a little bit of water on your gloves to help slightly reduce the amount of JBWW that sticks to them.
- Completely mix both parts of the epoxy putty
- Work in small batches (1/4 to 1/3 of the stick at a time)
- Apply 1/8 inch thick and 1/2 inch over each side of the seam
- Allow 24 hours to cure
- After 24 hours and before adding water, inspect the putty visually to ensure there are no gray streaks and physically to ensure that it is rock hard.
- Any putty that has gray streaks or is soft will need to be removed and replaced with new putty.
- Be sure the gap between the bottom of the chest freezer and the floor is fully supported.
- Do not apply silicone, caulk, or any other sealant over the epoxy putty – it is not necessary. However, the best practice is to install a liner. See this post:
Mindset and Timing
Mindset
How you approach a task makes a big difference. If you’re going to do the work anyway, would you rather enjoy it or be miserable?
There are only two things to change: your mindset (how you think about it), and your approach (how you go about it).
For your mindset, think of mixing and applying the putty as a practice, ritual, or a meditation. Take pride in your work. Find ease and joy. Focus on the purpose for cold water immersion and how it will benefit you.
To paraphrase Nietzsche: When you have a strong enough purpose for doing something, it makes the work easier.
For how you go about it it, maybe put on some music or get a friend to help. Having one person mix while another applies the putty can cut your work time in half. Put on some music. Take frequent breaks.
Find a way to make it fun. Pretend that you are a master craftsman or artisan. Think of the countless hours Michelangelo spent on his back painting the Sistine Chapel over four years or the three years it took him to carve the statue of David. Compared to that, a few hours of applying putty is a walk in the park.
Timing
The putty does not need to be applied all in one sitting. It is perfectly OK to work in shorter sessions and take breaks.
JB Weld tech support said to wait 2-3 hours, sand the cured bead with 60-80 grit sand paper, clean up the dust, wipe it with acetone, and you’ll be good to go. The overlap should be about 1/2-inch to be safe.
Video Resources
Here are a few videos that have been put together to show you how to mix and apply JB Water Weld and other two-part epoxy putties.
The first two are my videos with basic tips. The second two have additional information and tips that you will find helpful.
Common Problems to Avoid
- Not using enough putty.
Don’t skimp on this! It’s better to do it right the first time. If you do not apply enough putty, it can result in leaks and corrosion. - Adding another sealant on top of the JBWW.
Some people think that more sealant is better and have added silicone caulk, Gorilla glue, or other products on top of the JBWW. While the idea seems like a good idea, these products are poor choices because they do not hold up well in cold water long term, and can deteriorate when exposed to ozone or chlorine. Further, they leave your cold plunge floor and walls exposed. The solution is to install a liner! See this post:
https://chestfreezercoldplunge.com/4-liners/
3. Not mixing the putty well enough.
If you don’t mix the putty enough, it will not cure and there will be issues problems.
4. Not supporting the gap underneath the wide bottom of the chest freezer.
Without support, the walls and floor can still move, which can result in leaks. See this post for more info:
https://chestfreezercoldplunge.com/support/
5. Applying JBWW before you take your chest freezer to a Line-X shop.
Professional spray liner shops should do 100% of the work, including sealing the seams. See this article for more info:
https://chestfreezercoldplunge.com/LX