Liners for your DIY Chest Freezer Cold Plunge- Best Practice Options
Why do you need a liner for your chest freezer?
Chest freezers are not designed to hold water. After you seal the seams correctly (see this post https://ChestFreezerColdPlunge.com/sealing), installing a liner is an important step to protect your cold plunge. The right kind of liner will:
- help prevent leaks that can damage or destroy your chest freezer
- protect the interior walls and floor from scratches and dents, which can cause your chest freezer to leak or stop working
- increase the lifespan of your chest freezer.
There are options for all budgets, ranging from around $100 to $1,500.

Liners vs. Sealing the Seams
Let’s address two common misconceptions about modifying a chest freezer for use as a cold plunge:
- If I plan to install a liner, I don’t need to seal the seams.
- If I seal the seams, I don’t need a liner.
Removeable liners can fail. They can be ripped or torn. Standard pond liners sometimes arrive with micro-punctures. It is possible for moisture or condensation to build up between the liner and the chest freezer walls. If the seams are not sealed, that moisture can damage the chest freezer and shorten its lifespan.
Permanent liners are coatings designed to go onto an even, firm surface. They do not work well with cracks, gaps, or surfaces (like chest freezer walls and floors) that can flex and move. Because of this, the seams need to be sealed before the liner is applied.
If you seal the seams and don’t add a liner, you risk rust, corrosion, damage, and an early death of your chest freezer.
See this article for more information about sealing the seams:
https://ChestFreezerColdPlunge.com/sealing
Which chest freezers need a liner?
Liners are recommended for all chest freezers designed, built, and sold for food storage. Chest freezers typically have two different types of interiors:
- bare metal, and
- white enamel
NOTE: Some people think that the interior of their chest freezer is plastic. There is a 99.99% chance that, although it looks like plastic, it is white enamel applied to a metal wall.
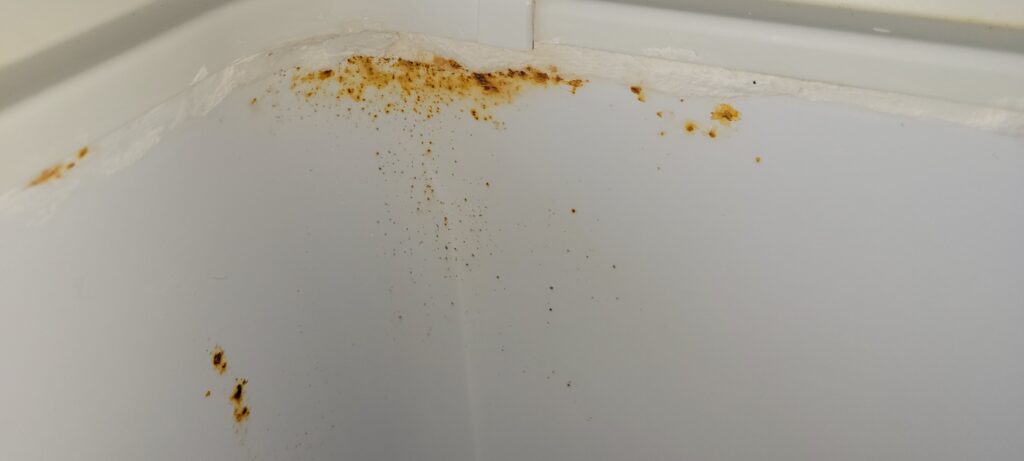
When I first started my DIY journey with cold plunges back in 2017, it was immediately clear that the aluminum interior walls and floor of chest freezers needed to be protected. They are very thin and prone to dents and cracks, and water will cause impurities in the aluminum (which in itself will not rust) to corrode within days or a few weeks.
The white enamel is applied to the metal underneath, which is thicker and more durable than the bare metal liners. Because of that, I thought it didn’t need any kind of liner. Now, after getting an increasing number of reports of surface rust (anywhere from 2 weeks to 2 years after being filled with water), we know that these chest freezers also need a liner.
There are a few reports from people who say they just filled up their chest freezer with water, and it has been “just fine” without sealing the seams or using a liner. However, these reports are few and far between. Roughly 90% of these chest freezers will leak within the first 1 to 12 months. 5% – 8% will leak or die within 12 -24 months. Fewer than 2% – 8% will last more than three years.
If you buy an inexpensive used chest freezer or simply don’t care and have the budget to replace it when it dies, you don’t have to use a liner.
If you want your chest freezer cold plunge to last as long as possible, then a liner is an investment that will save you time, money, and frustration.
What makes a good liner?
Many materials could be used as liners. Much like the many products that could also be used for sealing the seams, most are unsuitable. When I contact a manufacturer, there are several questions I ask:
- Is it suitable for long-term constant submersion?
- Will it hold up to near-freezing temperatures?
- Are there any chemicals in the liner that can leach into the water and harm your health?
- Will it hold up to ozone, chlorine, H2O2, or other sanitizers
All of the liner options I recommend can meet these criteria. There might be other options, but you’ll need to verify these for yourself to find out if it is suitable.
Categories of Liners
There are two general categories of liners:
- Removable
- Permanent
Each of these has two options: Do It Yourself (DIY) and Done For Your (DFY), which usually means a company whose business is making or applying that type of liner.
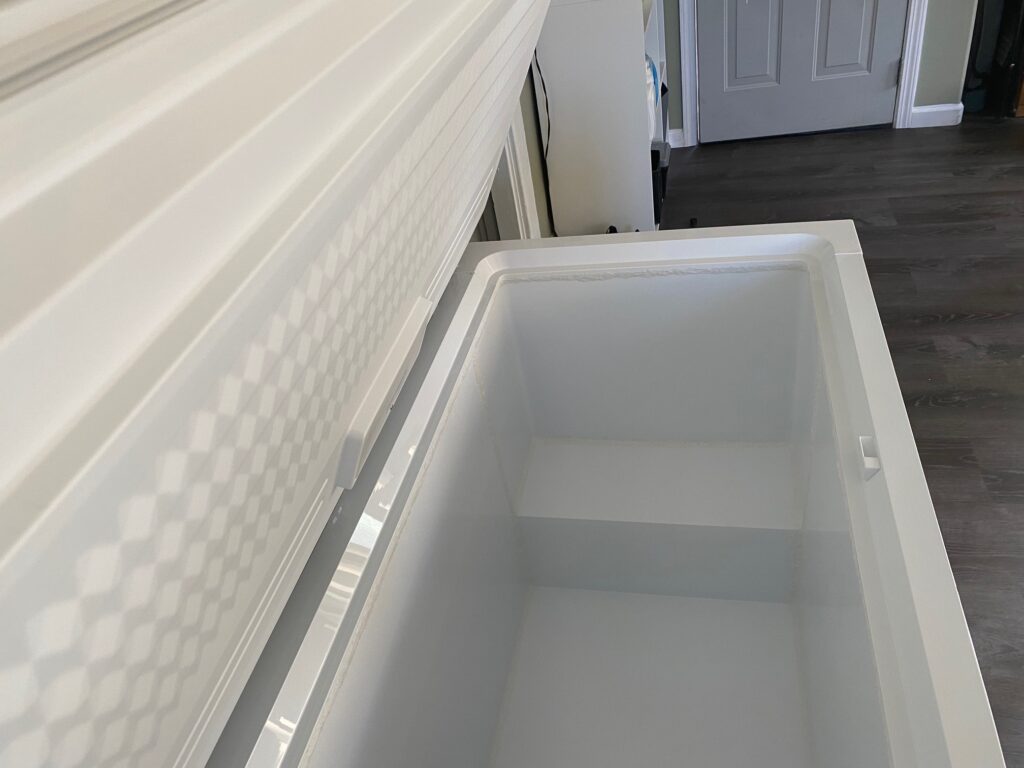
Removable Liners
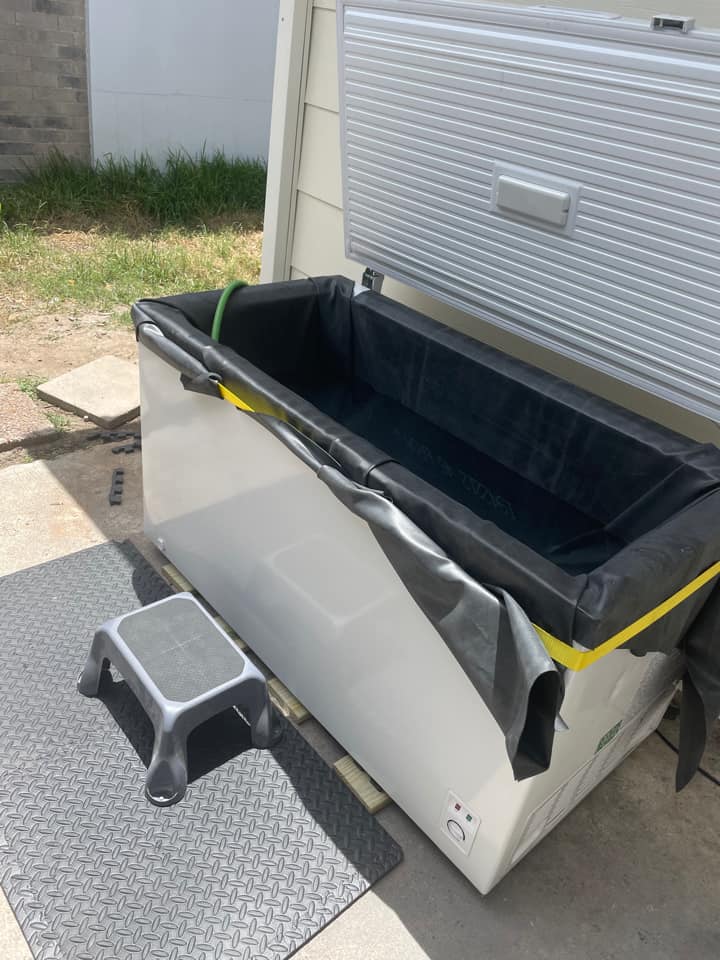
There are two removable options. This means that they can be installed and taken out of the chest freezer, replaced, or moved to another chest freezer of the same or similar size. The two removable liner options are:
- prefabricated EPDM pond liner
- custom PVC liner
Pond Liner
Pond liners can be bought from local hardware, garden stores, or online retailers.
Here is an Amazon affiliate link for one that I recommend:
Custom Liners
Custom liners can be made by your local pool company. I also offer custom liners. You can find more information here:
https://chestfreezercoldplunge.com/custom-liners

| Criteria | Pond Liner | Custom Liners |
| Prep Work: Bare Metal Interior | Seal the seams | Seal the seams |
| Prep Work: White Interior | Seal the seams | Seal the seams |
| Sealing the Seams | All seams must be sealed. Best practice is a 2-part epoxy putty. However, a high-quality silicone or aquarium sealant can be used. | All seams must be sealed. Best practice is a 2-part epoxy putty. However, a high-quality silicone or aquarium sealant can be used. |
| Warranty | Typically none. | 1-year on seams |
| Odor | Plastics can have an odor after being newly manufactured. This odor will go away on its own with time and can be reduced with cleaning and sunlight. | Plastics can have an odor after being newly manufactured. This odor will go away on its own with time and can be reduced with cleaning and sunlight. |
| Projected Longevity | The first pond liner I know of was put into a chest freezer in 2016. Update 2023: my friend who has been using a pond liner since 2016 has been through more than a dozen of them. They tend to leak after 6 – 12 months of use. | I designed and installed a custom liner in my chest freezer cold plunge in 2018. If taken care of it should last at least 6-10 years. To date, mine still looks new. |
| Estimated Time Required to Complete Project | Set aside 2 – 3 hours with two people helping. It depends on the thickness of the liner, your plan, skill at folding, how nice you want it to look, and how you decide to attach it. | 10 – 15 minutes to take and record the measurements. Production lead time and shipping time have varied from 3 – 8 weeks. Installing the liner: 15 – 30 minutes. |
| Colors Available | Black | White. Custom designs are available. |
| Compatible with Ozone | Yes. B-rating Some discoloration may occur. | Yes. A-rating. |
| Compatible with Chlorine | Yes, if made of PVC No, if made of EPDM | Yes (PVC) |
| VOC-Free | Yes/No. Yes, only if designated safe for fish and aquatic plants. | Yes – they are safe and rated for use in swimming pools and hot tubs |
| Method of Application / Installation | It can be tedious and frustrating and require persistence, but it can be done. Folding, heating, cutting, strapping, taping, Velcro, etc., may be needed. | Simple. Unpack, and insert into the chest freezer. You may need to cut out notches for the front hinges and/or handles. The liner hangs over all four outer walls and stays in place with gravity. No tape, glue, Velcro, or straps are needed. |
| Approximate Thickness | 10 – 45 mils (0.25 – 1.4 mm) 20 mils is the minimum but it can be prone to holes and tears. 30+ mils can be difficult to work with. | 20 -30 mils (0.5 mm) |
| Estimated Cost for 15 cu ft (420L) Chest Freezer | $120 – $400 The price depends on the thickness, material, manufacturer, and whether o or not it is safe for aquatic life. Avoid the cheap ones. | Local Pool Company: $800+ My custom liners: $599 – $799 Shipping is included if you live in the lower 48 US states. The price varies depending on your chest freezer’s style, size, and measurements. |
| Amount Needed for the Inside of a 15 cu. ft. (400L) Chest Freezer | One single sheet. See the spreadsheet/calculator in my Facebook group files section (or my book!) to determine the needed size. | One single liner, which is fabricated to your measurements. |
| Additional Material Needed | Strap, tape, Velcro, or something else to secure it in place. Additional pond liners when the current one fails. | None |
| Potential Downside | Common complaints: The liner is bulky, difficult (or impossible!) to fold/install, makes it difficult or impossible to close the lid, and hard to remove, clean and reinstall. Some liners have small holes that you won’t find until you spend hours installing it, only to discover afterward that it leaks. Many people do not like the way they look. Most stock pond liners end up leaking after 6 – 12 months and must be replaced. | It is more expensive initially than a pond liner. After a few years of replacing leaking pond liners, it is less expensive. Your measurements must be accurate to ensure a good fit. Measurements are checked against a database of other chest freezers of the same brand and size. |
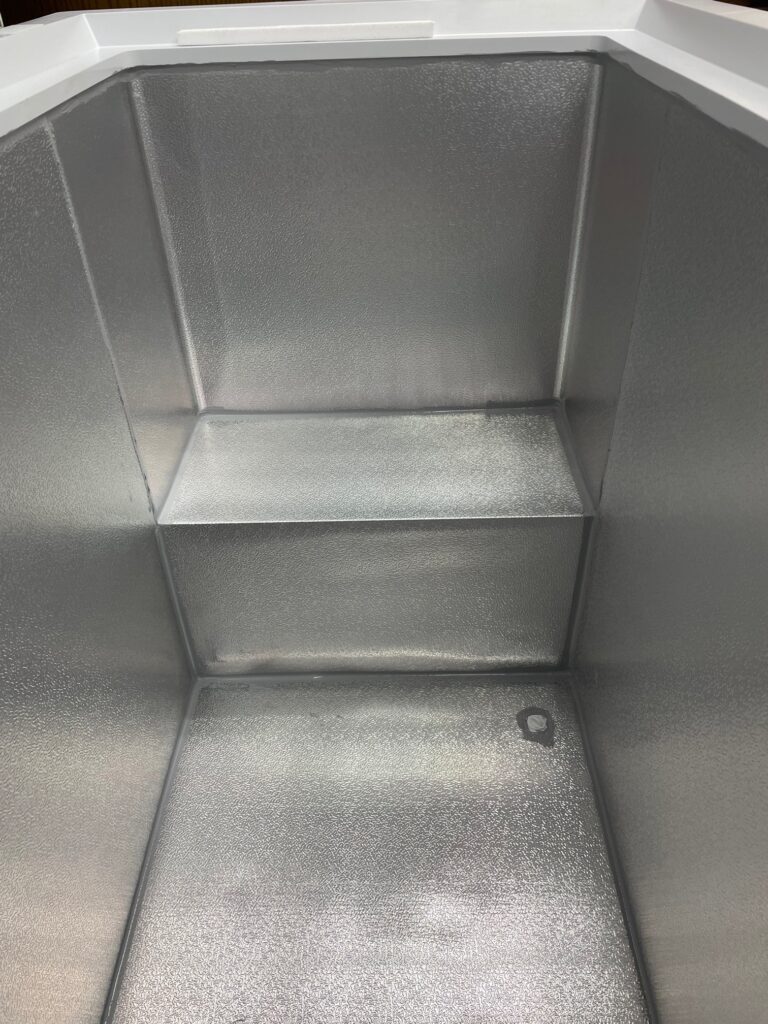
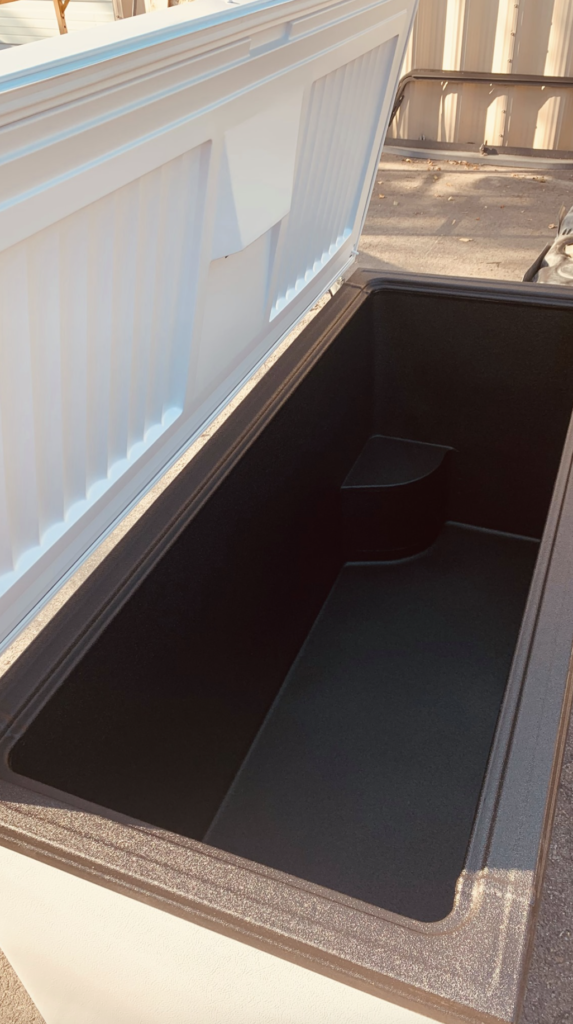
Permanent Liners
There are two recommended permanent liner options:
- Pond Shield (DIY) and
- Line-X (DFY)
Pond Shield
Pond Shield is a 2-part epoxy coating that is made by the company Pond Armor. It can be used in ponds, swimming pools, and other applications.
I have an Amazon affiliate link for Pond Shield here. Using this link, you get the same price, and I earn a small commission that helps me support our community.
See my article for more information on installing Pond Shield:
https://chestfreezercoldplunge.com/Pond-Shield

Line-X
Line-X is a 2-part urea or polyurea spray that can be used to coat truck beds or containers in municipal and industrial applications. It is applied by trained technicians with specialized equipment. There are different materials. See my article about Line-X for more information:
https://chestfreezercoldplunge.com/LX
You will have to search for a local shop. The Line-X corporate website can be found here:
I have no financial arrangements with Line-X.
| Criteria | Pond Shield | Line-X (XS-350) |
| Success Reports as of December 2023 | Countless at 1 – 6 months Dozens at 12 – 24 months 3 at 36+ months | Dozens of reports globally, one 36+ months old |
| Failure Reports as of Sept 2023 | Problems during application are reported frequently. Almost every single case seems to be related to not following the directions or best practices for the application. Problems can be fixed with a little or a lot of additional work and another kit. | XS-350 with correct prep and application: zero XS-350 with improper application: three, all of which were eventually fixed XS-100 with incorrect prep: 10+. In three reports, the chest freezer leaked, and the shop did not seal the seams before application. Not recommended for long-term submersion. |
| Compatible with Ozone & Chlorine | Yes | Yes |
| VOC-Free | Yes | Yes |
| Method of Application / Installation | Brush, roller, sprayer | Professionally Applied High pressure / high-temperature spray gun by Professional technician at their shop |
| Approximate Thickness | 10 mils (0.25 mm) when applied according to manufacturers’ recommendations. It might need additional coats depending on several variables | 20 mils (0.5 mm); Can vary greatly depending on how it is applied |
| Amount Needed for the Inside of a 15 cu. ft. (400L) Chest Freezer | Two coats are recommended as a minimum. 3-4 is better. Many reviews report needing more than the amount specified in the instructions. Plan for one or two 1.5 qt. / liter kits. | Determined by the technician |
| Additional Material Needed | Denatured / 99 percent isopropyl alcohol, rollers, brushes, trays, etc. | N/A |
| Prep Work: Bare Metal Interior | All seams MUST be sealed with a product that is hard after it cures. 2-part epoxy putty (ex. JB Water Weld) is recommended. Bondo might work but has not yet been tested. Pond Armor tech support recommend JB Water Weld, and says that their Crack RX product is not suitable for sealing the seams. | All seams MUST be sealed. You can use a polyurea caulk or pure urea caulk. You can use a 2-part epoxy putty, but it is probably overkill. The best practice is to have the shop do 100% of the work. |
| Tensile Strength | Exceeds that of concrete: 300 – 700 psi | 3,250 psi |
| Warranty | None | Lifetime, 1-year, or none. It depends on the shop. |
| Odor after curing | There is not supposed to be an odor after curing. | Some people have reported an odor, which typically fades away after a few days or weeks. |
| Time to Fully Cure / Wait this long before adding water | Even though the instructions say 24 hours, it’s best to wait 7 full days for a cold plunge applications to account for the colder temperature, humidity, and variations on mixing and applying. | 1 week |
| Projected Longevity | Years if the surface is prepared correctly and the product is mixed and applied correctly | Lifetime when prepped and applied correctly |
| Estimated Time Required to Complete Project | Prep: 1 – 2 hours Sealing the seams: 6 – 10 hours Sanding: 1 – 2 hours Mixing & Applying: 1 – 2 hours TOTAL: 9 – 16 hours | Drop it off at the shop. Pick it up when ready. Shop lead time may vary, but the work itself takes 3 – 4 hours to complete. Preparing the surface and sealing the seams likely takes much longer than applying the liner. |
| Texture | Smooth, but sand can be added to the top coat while it is still wet | Variable but typically rough. Discuss with the technician. |
| Colors Available | Black, Clear, Tan, Gray, Competition Blue, Sky Blue, Forest Green and White. You can mix colors or they can mix them for you if you provide a color chip. | Black is standard. Some shops may have white. Custom colors are available but can increase the price substantially |
| Estimated Cost for the inside (and up and over the trim) of a 15 cu ft (420L) Chest Freezer | TOTAL: $295 – $480 Self-Etching Primer: $25 – $100 1.5 quart (1.4 L) kit- $80 – $140 Denatured Alcohol: $10 2-Part Epoxy Putty: $130 Sandpaper, brushes, rollers, spray gun, mixing pan, gloves, safety gear, misc.: $50 – $100 | $600 – $1,500 for XS-350 $300 – $600 for XS-100 Bids vary greatly from shop to shop. Globally, prices seem to range widely for just the inside, with the shop doing all of the prep work. Again, XS-100 is not recommended. Use it at your own risk. |
| Potential Downside | As with any DIY project, your prep work and workmanship and quality of supplies used play an important role in the excellence and durability of the final result. A growing number of people report problems when they think they have followed the directions, but accidentally missed something or did not pay close attention to the quality of their work. | Some shops will not line a chest freezer. Communication with the shop about the scope of work can break down. Some shops will not do the prep work. Some shops do the prep work incorrectly. Some people dislike the rough texture. It can be difficult to clean. There is conflicting info from techs about best practices. |
Up and Coming
Fiberglass (Permanent liner)
As of 2023 we have a growing number of people applying fiberglass to the inside of their chest freezer. However, I don’t have enough reports or long term reports yet about how well it holds up.
Several experienced artisans have told me a chest freezer is not a good fiberglass project for beginners because there are too many potential things that can wrong.
There are many websites with information and details about applying fiberglass, but so far I have not found any that give detailed step by step instructions for a chest freezer cold plunge, much less with troubleshooting tips and long-term results.
Products to Avoid
It would be difficult to maintain a list of all of the products that could be used as a liner, but are not suited. We have a LOT of failure reports from:
- Crommelin products
- Single part pool paints
- Regular paint of any kind
- Construction materials (ex. roof sealants)
- Bathroom products (tile sealants)