
Pond Shield – 7 Steps to Success!
In this post, you’ll learn the big-picture steps for applying Pond Shield (the product) from Pond Armor (the company) to protect your chest freezer. It does not go into details about supplies, or tips/strategies for mixing, applying, troubleshooting, or cleaning the product. For that information, please see this post in my Facebook group:
https://www.facebook.com/groups/chestfreezercoldplunge/posts/1006001890069101/
1. Before You Start
How Much Do I Need
Typical Pond Shield applications only require 2 – 3 coats. However, a cold plunge is not typical, and with 3 or fewer coats we have many reports of the cured product getting chipped from pumps or filters.
Best results seem to come from applying four coats.
Less than three coats will likely not result in good enough coverage. Five or more coats will add too much weight and can cause the layers to peel off from themselves.
For a chest freezers 15 cubic feet (400 L) and smaller two (2) 1.5 qt. kits are needed.
For chest freezers larger than 15 cu ft (400 L) three (3) 1.5 qt. kits should be used.
If you have some left over, it is OK to apply additional coats, per the instructions.
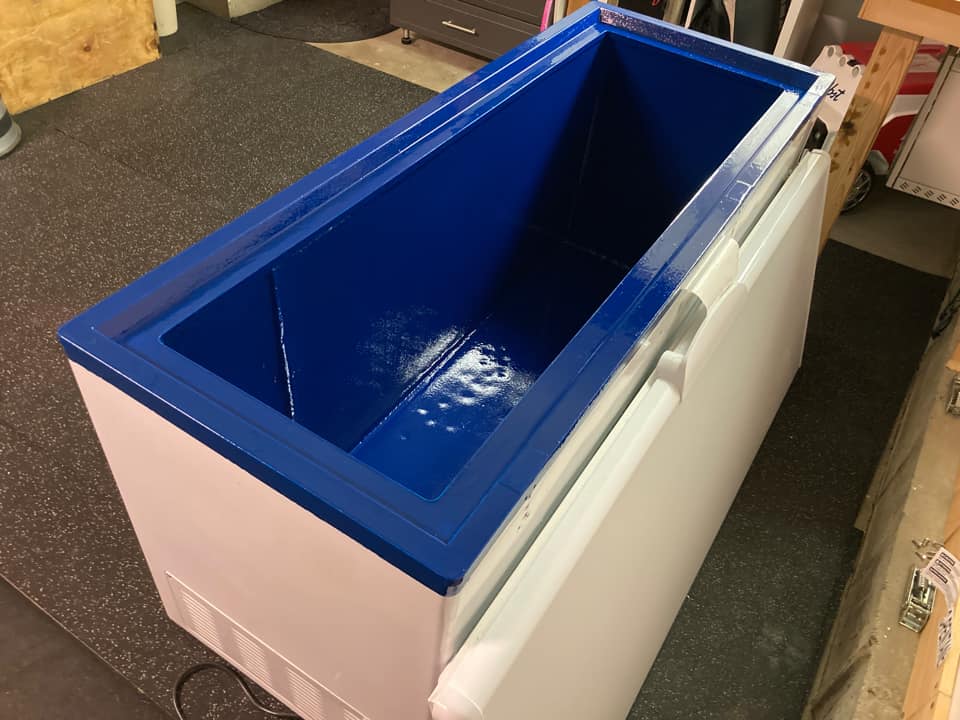
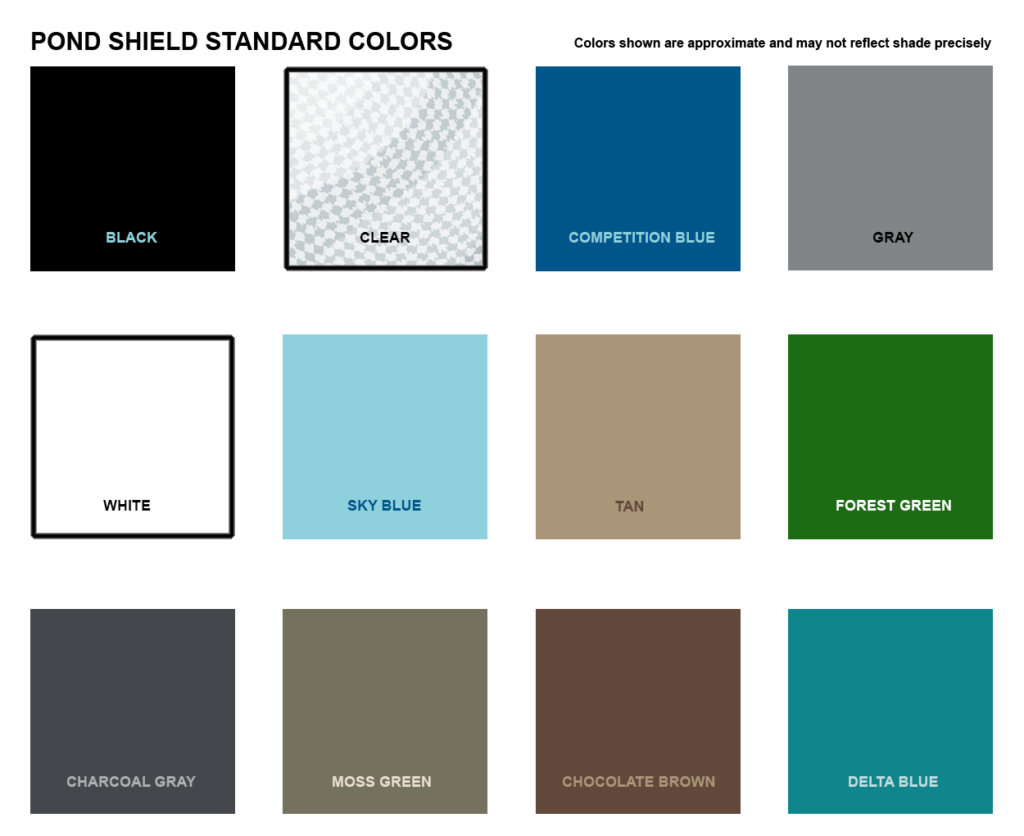
What Color Should I Use
Pond Shield comes in a variety of colors, including clear. Use whatever colors you like. Lighter colors make it easier to see dirt and water quality.
Here is a swash of available colors. Yes, they can be mixed and matched.
Where to Order
Pond Shield can be found online in most countries. I have an Amazon affiliate link below (same price to you and I earn a small commission).
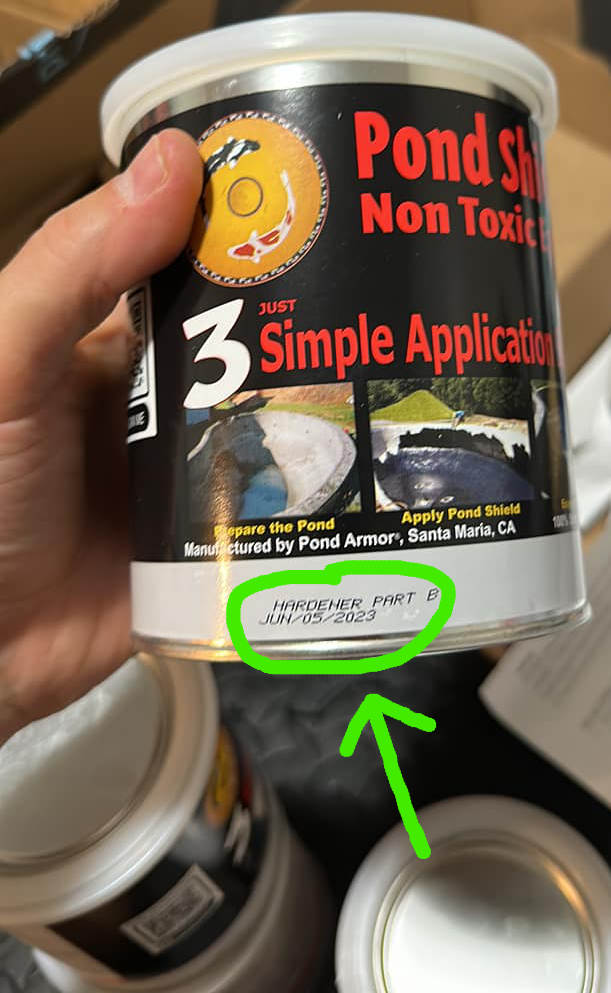
Check the Expiration Date!
Pond Shield has a shelf life of 24 months. If it is past the expiration date, exchange them for newer ones.
The date on the can is the date it was manufactured.
Read The Instructions!
Read all of the instructions here and the instructions that come with the Pond Shield product. I’m always amazed when people make a catastrophic mistake that could have been avoided had they taken a few minutes to read the instructions before starting. PAY CLOSE ATTENTION TO THE WEATHER REQUIREMENTS. Temperature and humidity can make or break a Pond Shield application.
Did I mention to read the instructions before you start? The instructions included with Pond Shield should be read and followed, along with the information here.
The single largest reason for Pond Shield failures is people not following the instructions!
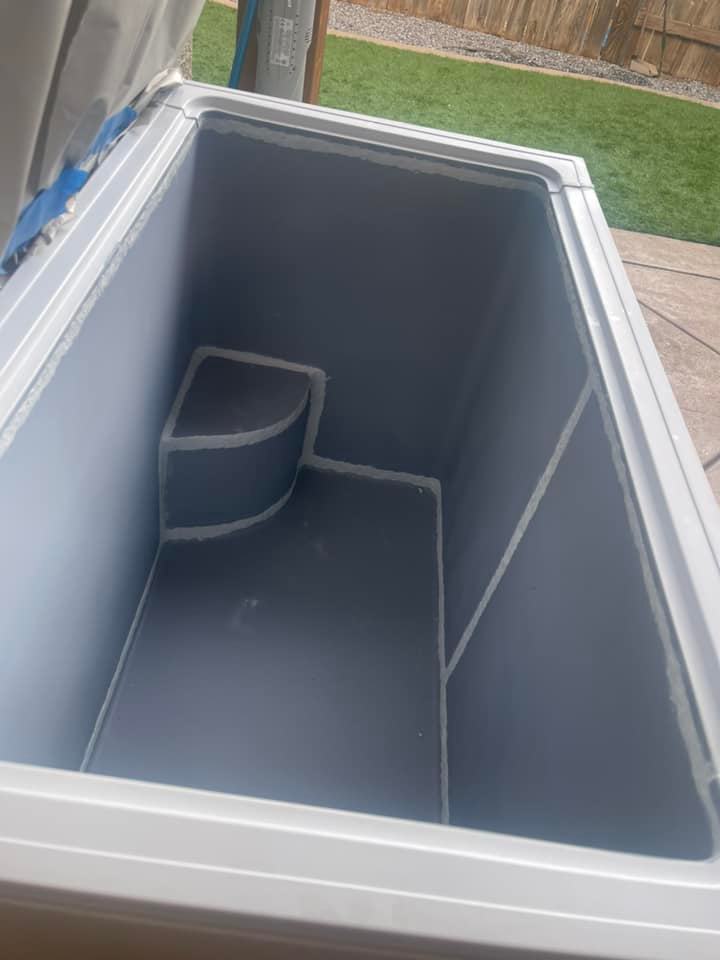
What Parts of the Chest Freezer Should Be Coated?
If the edge of the Pond Shield application is exposed to water over time, water can get underneath and cause it to peel off. The same goes for Line-X, by the way. Because of that, for best results, Pond Shield should be applied to the entire inside, and all of the plastic trim on the top wall, including the small piece that is above the outside walls.
For an even stronger application, apply it about 1″ (2.5 cm) inch down the outside wall metal wall. If there is any kind of seam or gap between the trim on the outside and the little walls on the outside, seal it with a thin line of epoxy putty. You can use Bondo for that seam since it will not be submerged.
Ambient Temperature and Humidity
The air temperature and humidity of where you are working can make or break a Pond Shield application. You can do everything else 100% right, but if the temperature or especially the humidity is outside of the recommended range, you can have problems.
The minimum temperature range to apply Pond Shield is 50°F / 10°C. The ideal temperature range is between 75°F – 85°F (24°C – 30°C).
The ideal humidity is below 50%. If the humidity is above that, you can have serious problems.
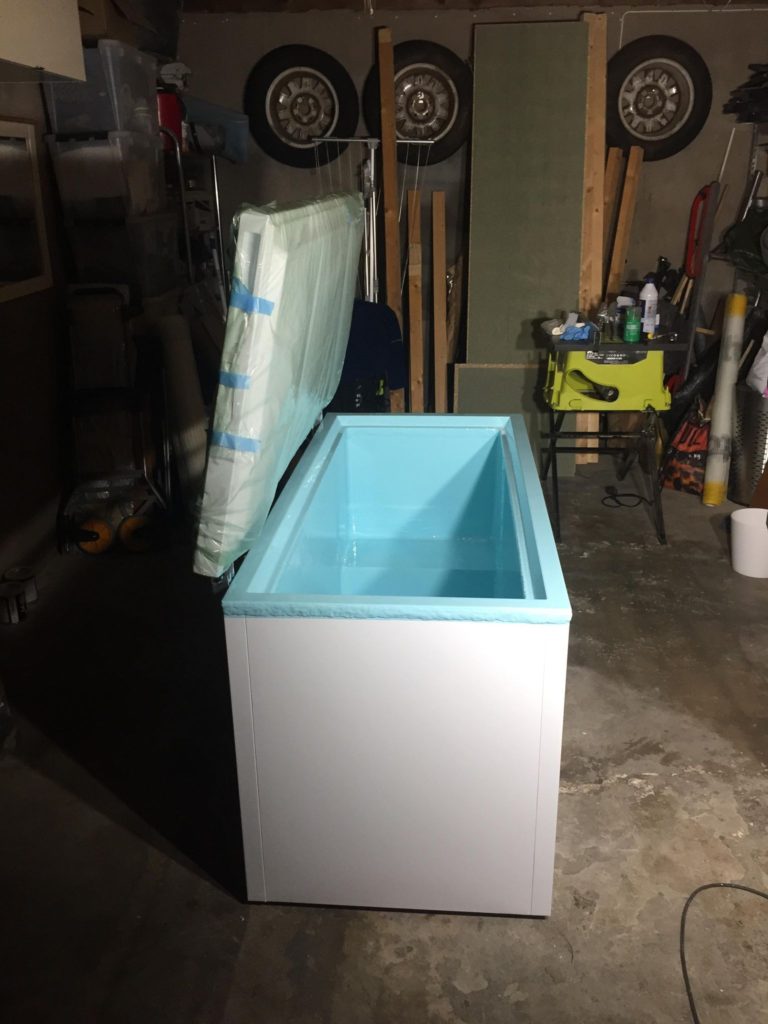
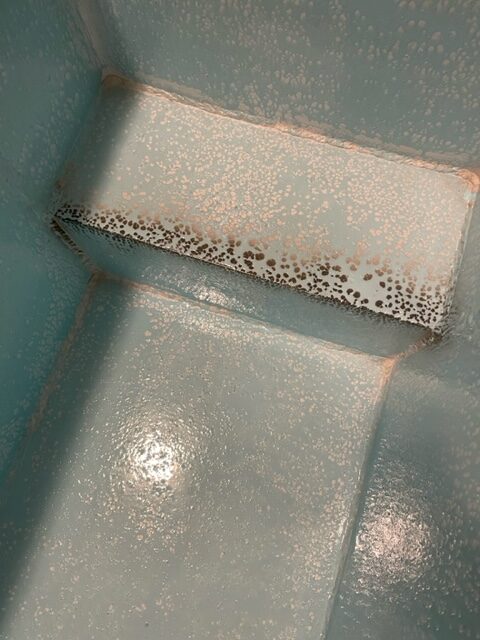
One person in our community meticulously followed every single step of preparation correctly. The only thing he did not know was that his ambient humidity was very high. The picture below shows what happened.
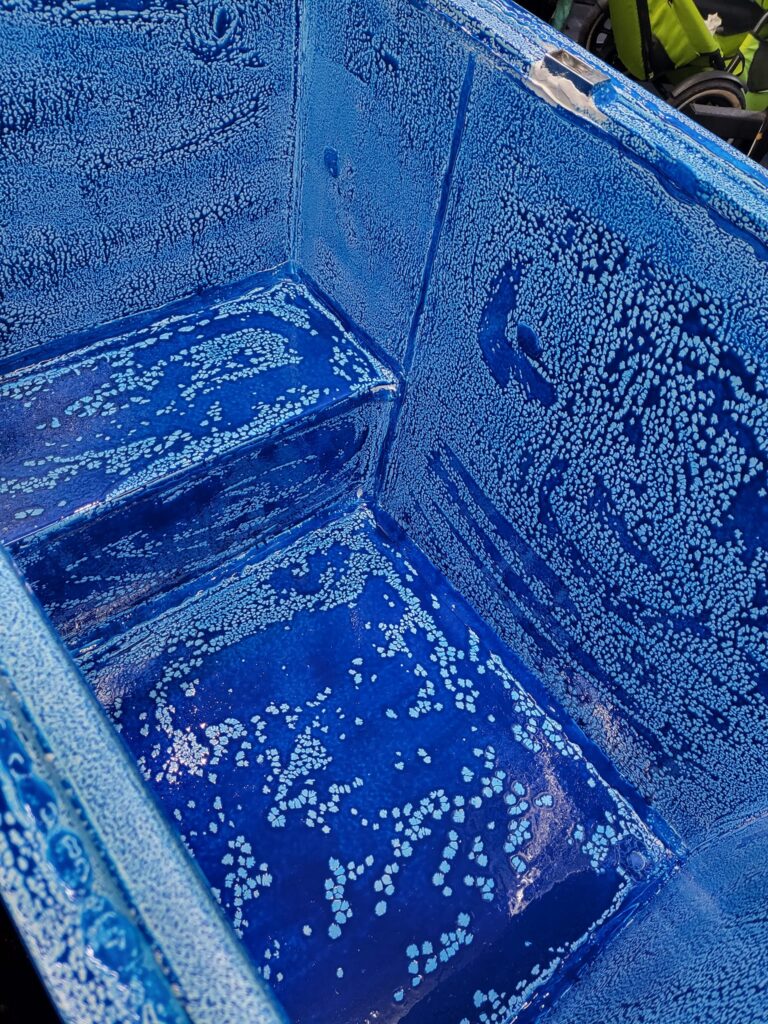
He had to remove all of that first application and start over.
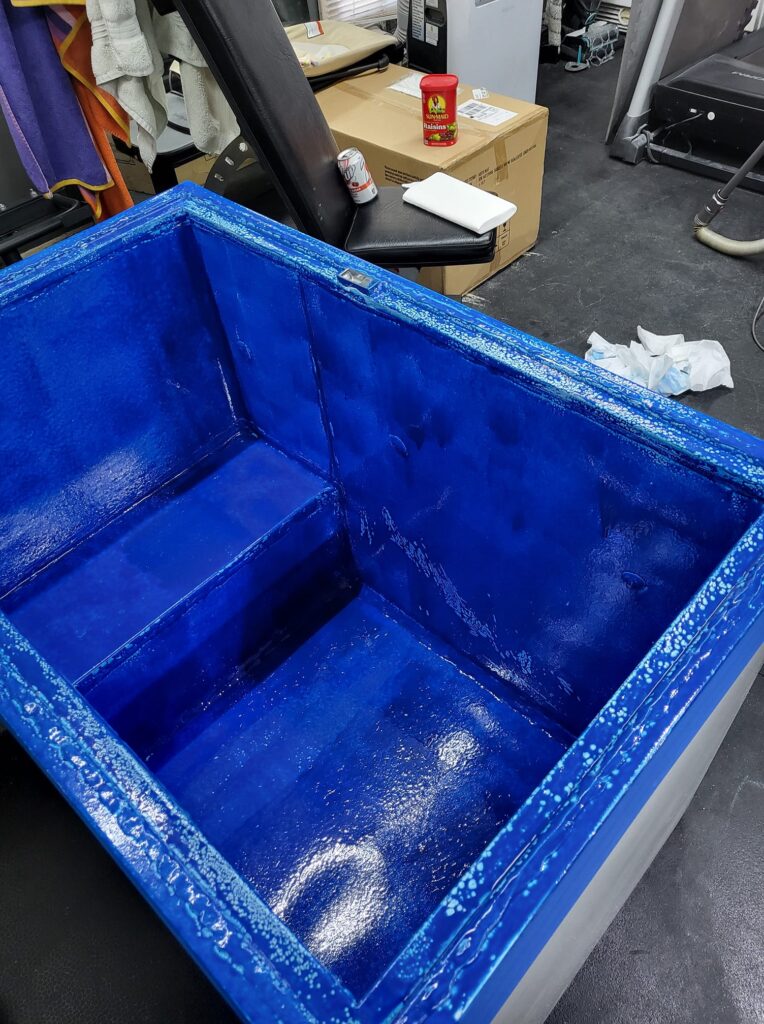
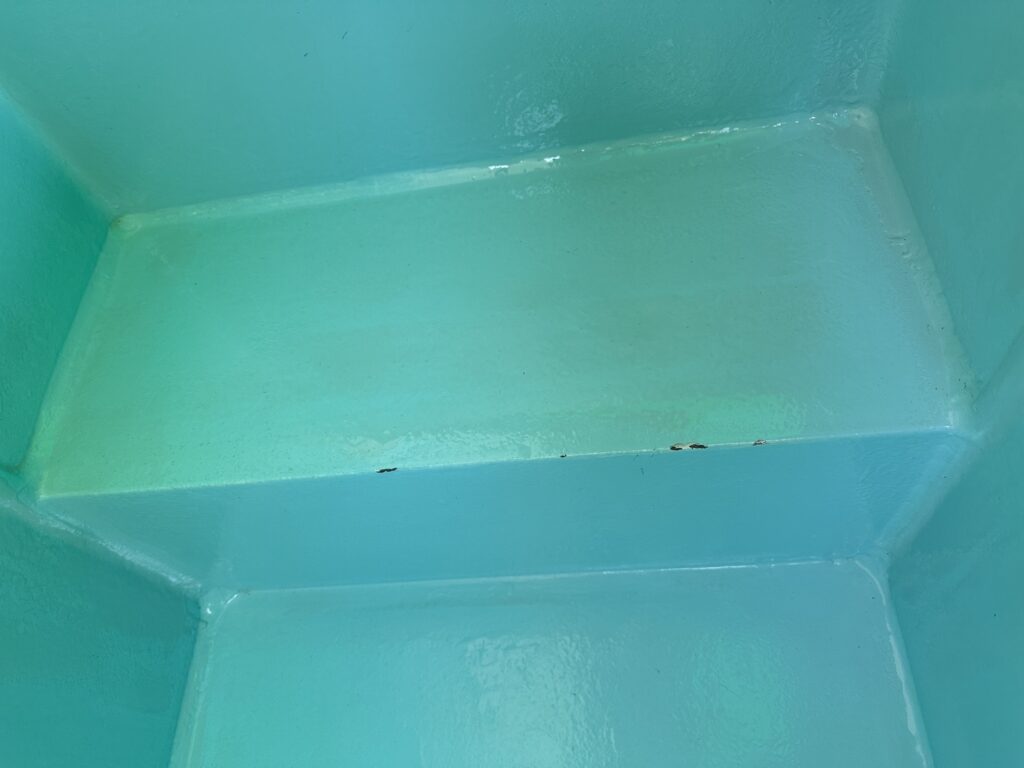
After moving his chest freezer into a closed area, and running a dehumidifier to get the humidity below 50%, he tried again. This is a picture of his new first coat:
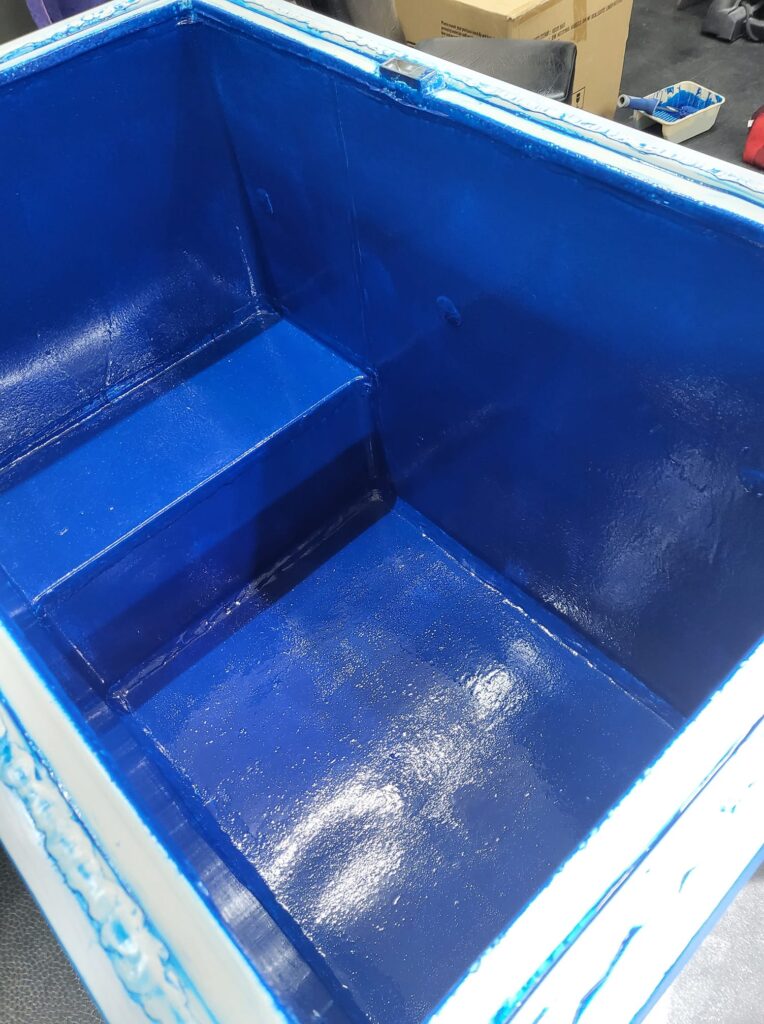
The below picture is after an additional coat. Problem solved!
Pond Shield should be applied in an area that is dry. If it gets wet before it cures, there will be problems.
2. Sand the Surface
Sand the entire surface with 60-grit sandpaper where Pond Shield will be applied.
Because the chest freezer walls can be easily damaged, I recommend sanding by hand. If you are comfortable using power tools and know you can use a powered sander without applying too much pressure, you can use one for wide surfaces. The corners will still need to be sanded. Vacuum up the dust with a soft brush accessory.
The entire surface should feel rough to the touch. Do you feel any smooth spots? Sand them some more!
After sanding, wipe the entire surface with isopropyl alcohol or acetone using a microfiber cleaning cloth. Seriously – do not skimp here or get in a hurry. Make sure the surface is 100% free of any debris, skin oils, or other residue. Wear gloves while you do this.
Do NOT touch the surface after you have cleaned it.
Do not sand until you are ready to begin working. If you sand and leave any metal exposed, it may begin to rust after a few days.
Here is what needs to be sanded:
a. Bare Metal
The entire surface needs to be roughed up. Yes, including the “valleys” in between the texture, which can be hard to reach with sandpaper. Some people have used a wire brush to do this, but be careful – the walls are paper-thin.

b. White Enamel
The ultimate best practice is to remove all of the enamel, however, this can be an enormous undertaking. The next best practice (which is getting good reports so far) is to rough it up and be sure that there are no enamel flakes peeling off. Some metal underneath may be exposed. If that happens, don’t panic! It’s totally OK. See step 3
c. Plastic Trim
Rough up the plastic trim.
d. Rust/corrosion
If there is any rust or corrosion, it must be completely removed by sanding or chemical rust removers, such as CLR.
3. Seal the Seams
Seal all seams with 2-part epoxy putty. JB Water Weld is the gold standard. If you live in a country where JBWW is not available, find a comparable product, such as Selleys Knead It Aqua. Other options include All-Fix and PC11.
The Pond Armor tech said that Bondo could also be used, but so far we have no reports from anyone who has done so. Let the 2-part epoxy putty cure for 24 hours for best results. Ensure that it is 100% solid and has no gray streaks.
What about other products?
Do not seal the seams with silicone, moisture-cure polyurea, marine adhesive, or caulking of any kind because Pond Shield will not adhere to it and can peel off over time.
One common question: should the seams be sealed before or after applying the self-etching primer? It can be done both ways. Either way, the surface needs to be sanded before applying the self-etching primer and the epoxy putty to seal the seams.
The epoxy putty does not need self-etching primer to adhere to the chest freezer walls, and Pond Shield will adhere to the epoxy putty with or without self-etching primer. So it’s up to you which order you apply them in.
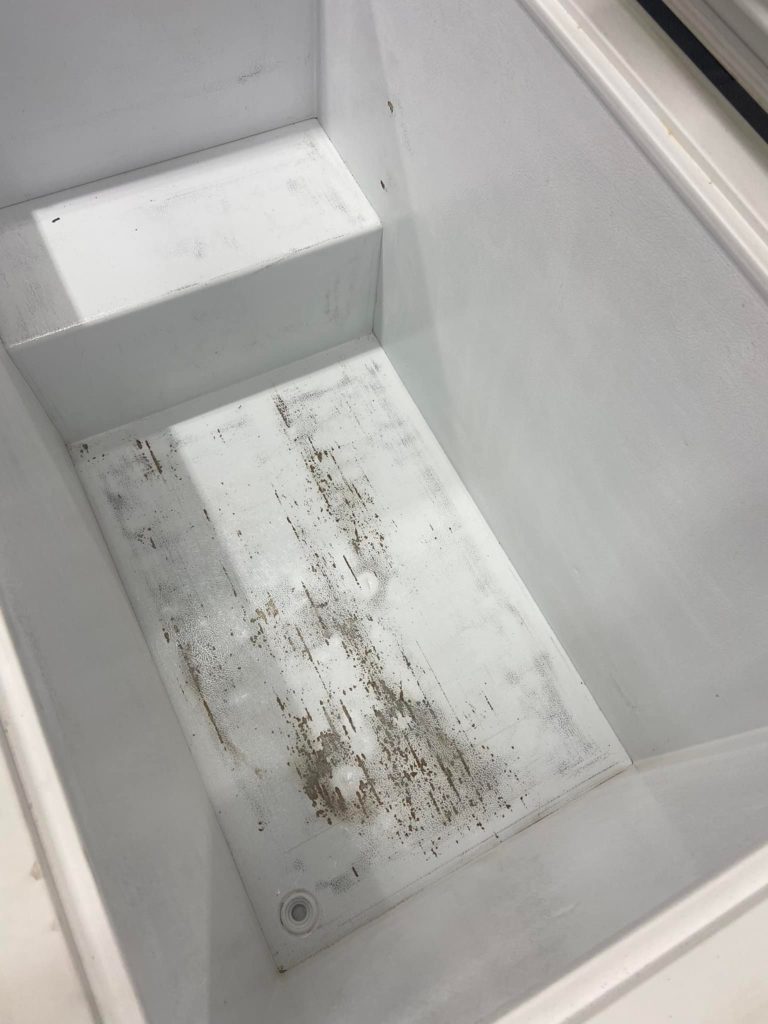
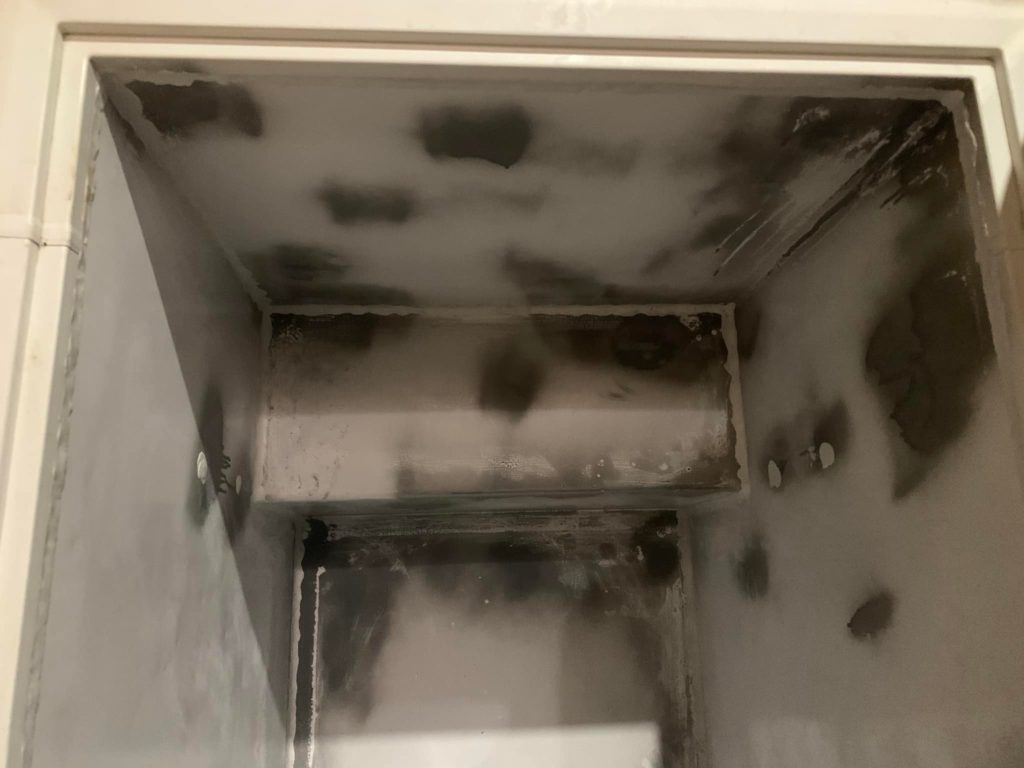
The Compressor Fold
The front top edge of metal over the compressor is a fold, not a seam. However, a couple of people have reported Pond Shield cracking there. The damage in the below picture happened during maintenance. The water was drained and the filter canister was sitting on the top edge wall and fell down, causing the damage. Note: don’t put your filter or any other objects on the top wall when doing maintenance!
If you’d like to eliminate the possible risk of that happening, apply a bead of JBWW over that fold, 1/2-inch (13 mm) over the top and down the front.
4. Sand Again
Wait 24 hours for your epoxy putty to completely cure. Sand the cured epoxy putty with 60-grit sandpaper.
Vacuum the dust, and wipe with a microfiber cloth and isopropyl alcohol or acetone. Let all of the alcohol or acetone dry (it evaporates quickly) before going to the next step.
5. Apply Self Etching Primer as Needed
Mask off any areas that will not be coated. Use painter’s tape and drop cloth/ newspaper for wide areas. If you touch or drip sweat on any area where Pond Shield or self-etching primer (SEP) will be applied, wipe it off before proceeding. Any residue (skin oils, dirt, sweat, etc) on the surface can prevent Pond Shield from adhering properly or can cause what is called “fish eyes,” which look like little round pits.
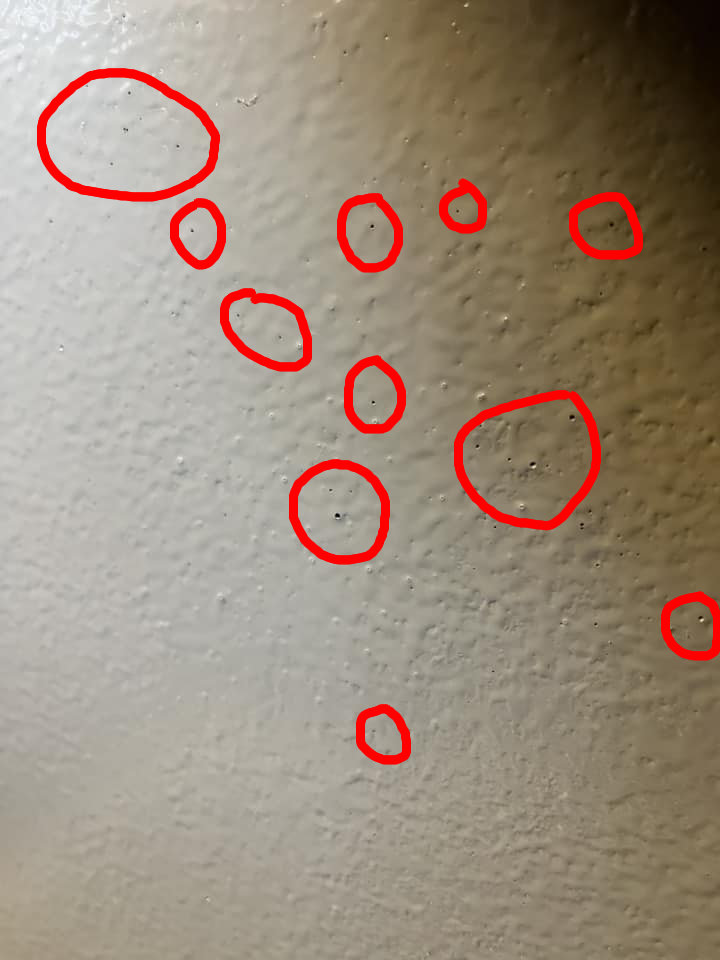
Use any brand of self-etching primer except Rustoleum. Do NOT use Rustoleum. Again, *any* other brand will be fine. Why not Rustoleum? Pond Armor, the company that makes Pond Shield has specifically advised against it, and despite this, people still use it and wonder why their Pond Shield peels off. Maybe a picture will help dissuade you from using Rustoleum.
It does not matter if you apply the primer before or after sealing the seams. Either way is fine, however, I think it is easier to sand the epoxy putty before the primer goes on.
Where to apply?
Cover ALL exposed metal with self-etching primer. One coat is enough.
Where not to appy?
If you have a white enamel interior, only apply primer to the areas where metal is exposed. Primer does not need to be applied to any white enamel reamining after sanding. You do not need to mask the white enamel around the exposed metal. It is OK for the primer to overspray onto the white enamel.
The top trim (plastic) does not need self-etching primer.
Follow the Directions
Follow the directions on the can of self-etching primer for how long to wait before applying Pond Shield. Waiting for 30 minutes is a general guideline, but it could be a bit shorter or longer, depending on the product you are using.
Usually, it is best to start applying Pond Shield before the self-etching primer completely dries, but again, follow the directions that come with your SEP.
If you come back several hours later, or the next day, it is likely that the self-etching primer will already be completely dried. If that is the case, the self-etching primer will need to be roughed up with sandpaper (60 grit) and all residue wiped away before applying Pond Shield. Be careful not to sand so hard that you remove the self-etching primer.
One 15.5 oz can of self-etching primer covers approximately 10 square feet.
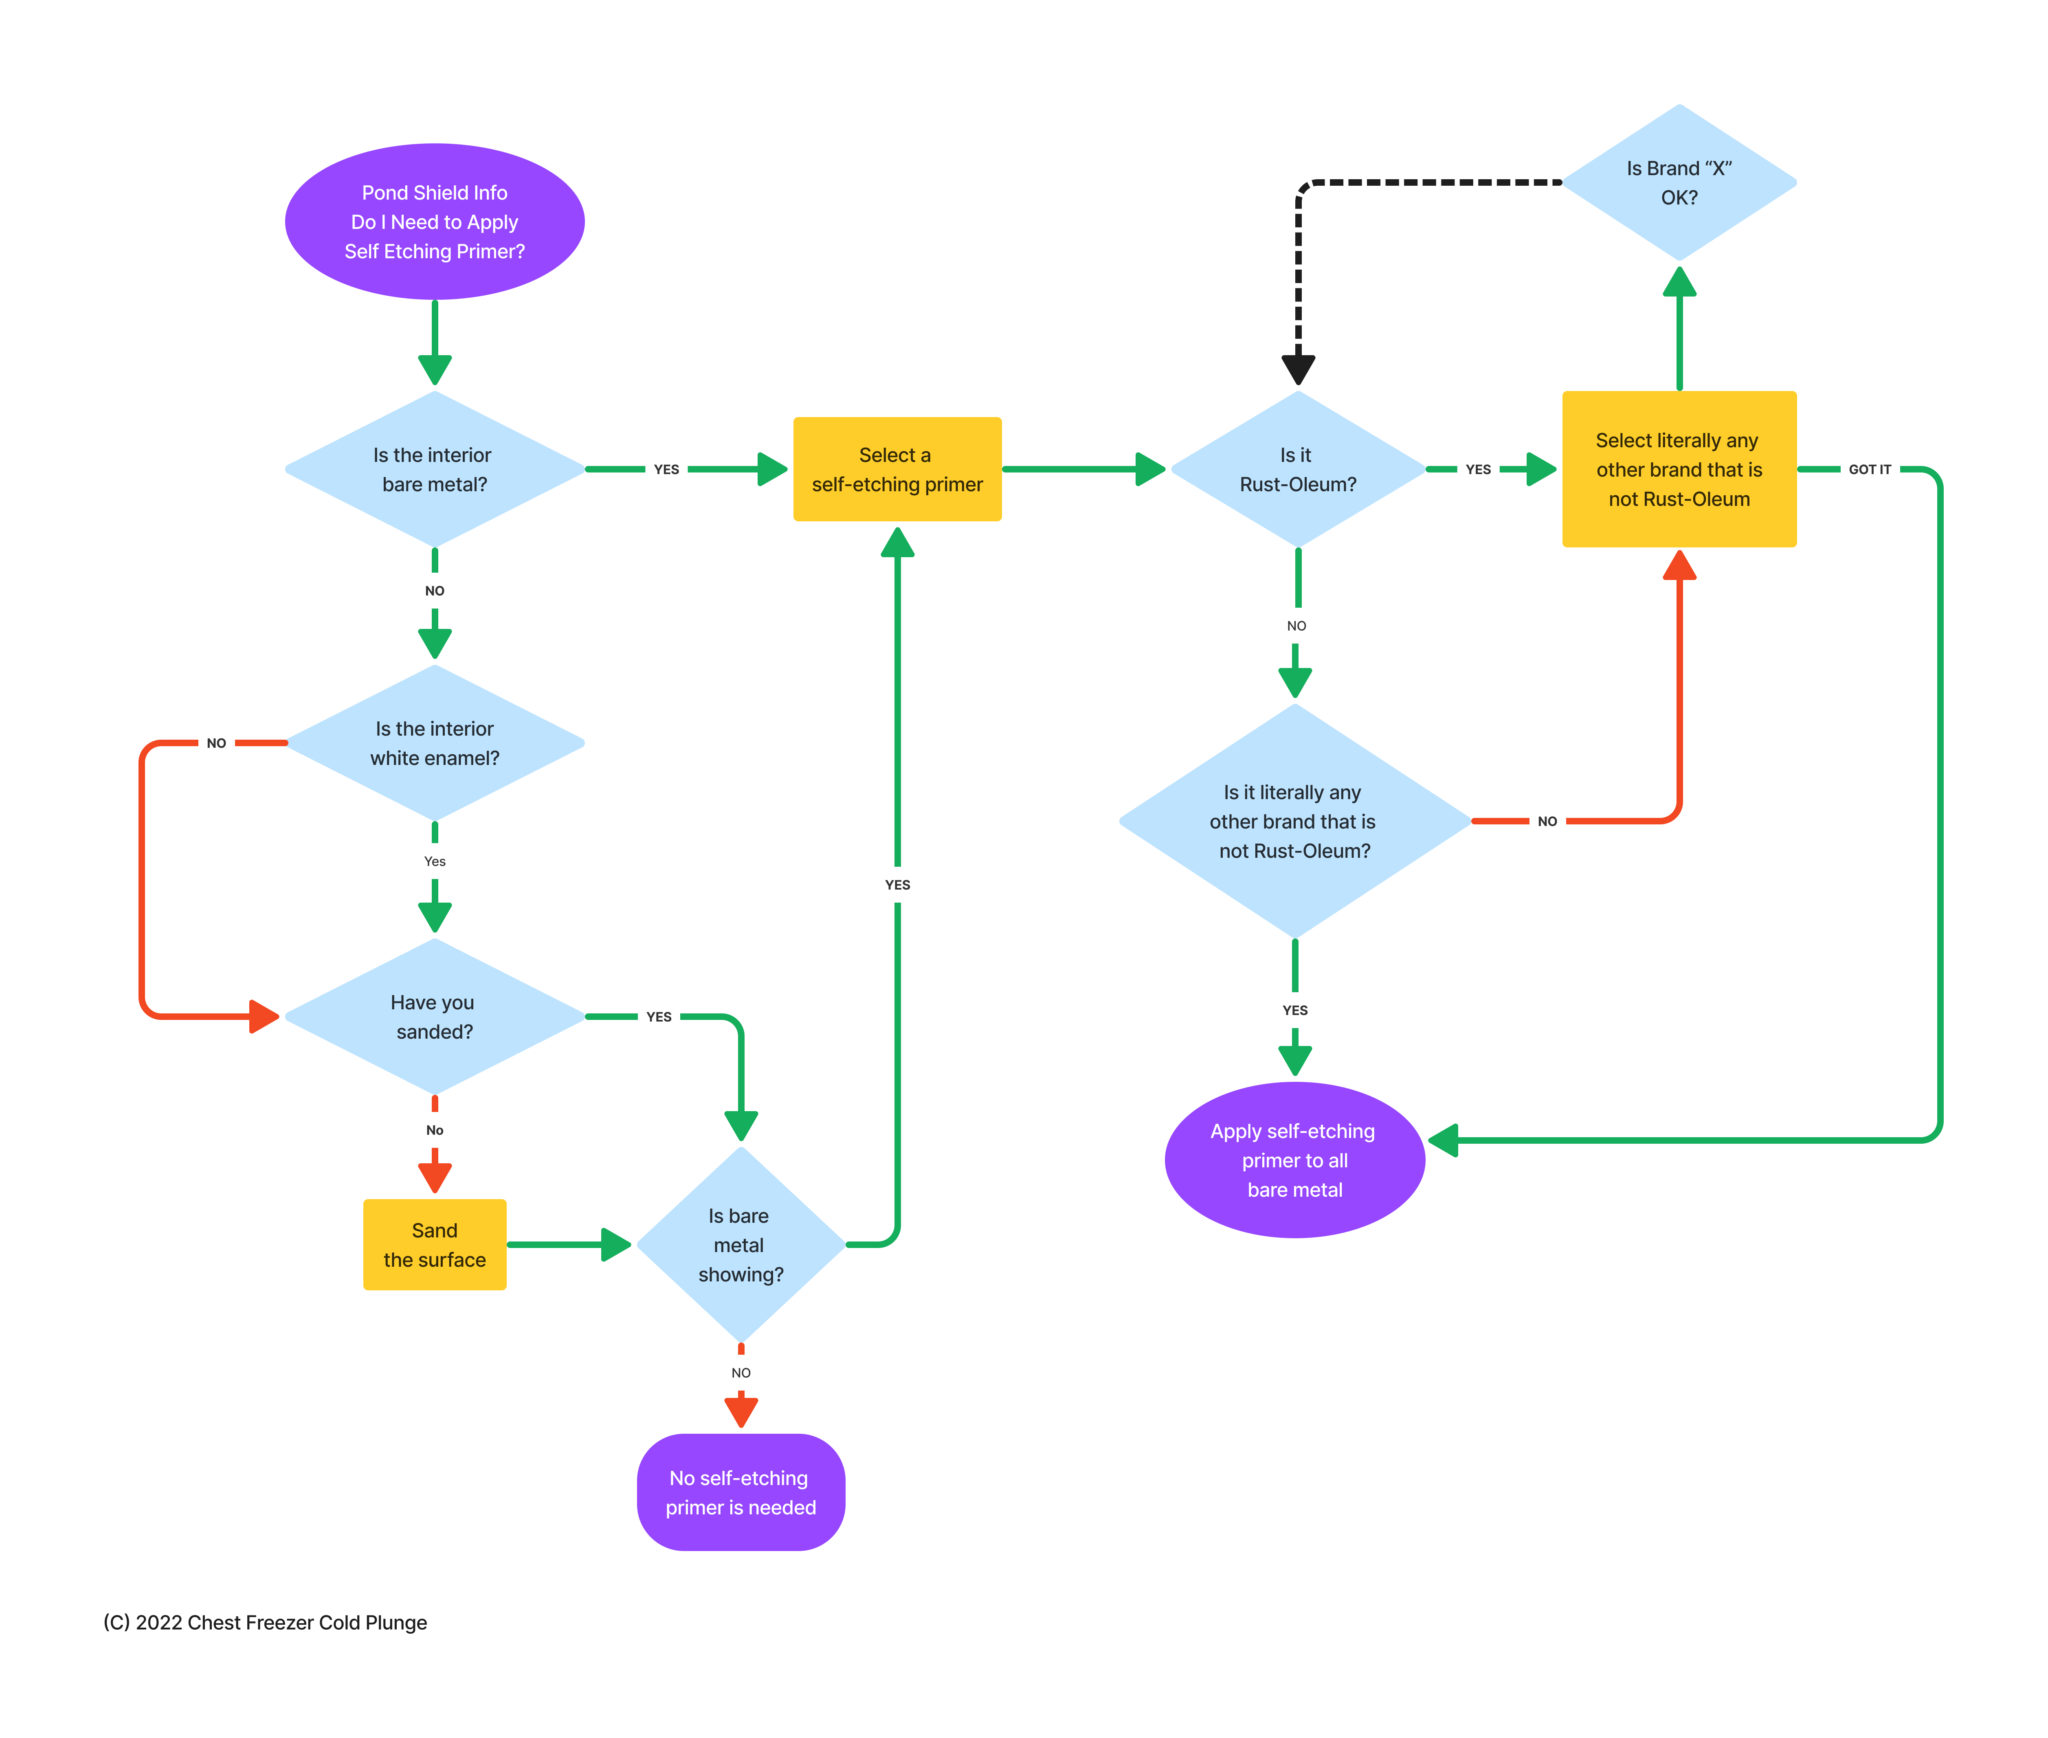
Flow Chart – Do I Need to Apply Self-Etching Primer?
Right click and select “View Image” “Open Image in New Tab” or similar to view a higher-resolution image of the below flow chart.
6. Mix and Apply Pond Shield
After the self-etching primer dries, apply two or three coats of Pond Shield.
Follow the directions on the kit. If you are in my Facebook group, search for “Pond Shield Master Post” for expert tips on mixing and applying. There is also a video with tips from an experienced epoxy resin artist.
You will need to join my free Facebook group. Be sure to provide legit answers to the screening questions and agree to the rules. Here is the link to the Pond Shield Master Post:
https://www.facebook.com/groups/chestfreezercoldplunge/posts/1006001890069101/
We do not recommend using a drill attachment to mix the two parts because it can introduce bubbles, which can show up as dimples after curing. See the below pic. It is best to mix by hand.
Brushes vs Rollers
Rollers work well for wide areas. Brushes are better for corners and edges.
Here are some tips for rollers:
- Use a high quality microfiber roller.
- Wash it well and let it dry completely before using it.
- Use a different cover for each coat.
- 4″ rollers seem to work better than larger ones
Here are some tips for brushes:
- use a high-quality brush.
- Use a 4-inch stubby bristle brush
- Switching between a brush and roller can help make the coats more even
The finished coat is supposed to be 10 mils / .25mm thick. It’s difficult to determine exactly how thick that is. If there is any doubt, apply an additional coat. You are already investing time and money into applying Pond Shield, so you might as well do the best you can. There is a risk of an application that is too thin. There is no practical downside to having a third or even fourth coat of Pond Shield. Having additional coats will not affect the chest freezer’s compressor at all or its ability to chill your water.
How Many Kits are Needed?
One or two 1.5 qt. kits might be needed for a 15 cu. ft. chest freezer. Use two kits if you want to add three or four coats. Two or three 1.5 qt. kits might be needed for a 21 cu ft chest freezer.
Timing To Apply Additional Coats
Option 1
After applying your first coat, you will most likely have some thin or bare spots. This is OK. It is best to wait at least one hour, but no more than 10 hours before you apply the second coat. If you add a third or fourth coat, the same rule applies – wait at least one hour, but no more than ten hours. If you wait more than 10 hours, the previous coat will need to be sanded before the next coat is applied. Rough it up with 60-grit sandpaper, and vacuum or wipe up the dust. Do not apply acetone or any other de-greaser.
Details on Additional Coats
For multiple layers, there are two options, and it depends on how much time you have:
Option 1. Let the first layer dry (10 – 24 hours), sand, wipe up the dust, and then apply additional coats, letting each one dry completely before repeating (sand, clean, apply next layer).
Option 2. Apply additional layers before the previous layers cure (no need for sanding).
Both methods will work. If you wait, sanding will give tooth for the additional layers to adhere to. If you apply it while it is still tacky, there will be a chemical bond created between the additional layers.
One easy way to determine when you can apply that additional coat is to use the gloved finger tacky test.
Place a gloved finger on the surface of your Pond Shield. There are three options:
1. It does not feel tacky at all: sand again and clean up all of the dust before applying the additional layers.
2. If the surface feels tacky, and no Pond Shield comes off on your glove, then you are good to apply additional coats.
3. If Pond Shield sticks to the glove, you’ll need to let the surface cure for a while longer until it can react like #2.
NOTE: Experienced painters have said that Option 1 will produce the best long-term results, which is to let each coat dry, then sand and clean before applying subsequent coats.
How Many Coats Are Needed?
Never apply fewer than three coats.
Four to five coats will give you the best long-term results.
Six or more coats could add to much weight and cause the application to separate from the chest freezer walls. Do not apply more than five coats.
Shimicoat Note
Pond Shield is chemical resistant and should not fade if using chlorine, ozone, or other chemicals for sanitation.
However, if you are using Shimicoat, the company recommends that the last layer be a clear coat of chemical resistant clear epoxy to help prevent potential issues with discoloration or fading, especially if using pool chemicals or chlorine. This is not essential, but is a nice-to-have if you want your color to remain the same.
7. Let it Cure
For best long-term results, allow it to cure for 7 days before adding water. The Pond Shield website says it will cure in 24 – 30 hours. However, that is for regular applications, which do not typically have water that will be immediately exposed to the extreme water temperatures we use in our cold plunges.
Our community epoxy resin expert says that while the instructions say you can add water after 24 – 30 hours, this means the product has set, but it has not yet reached maximum hardness. If it has not reached maximum hardness, chemicals could leach into the water.
Moreover, there is more to a product curing than it being dry to the touch. The epoxy needs to harden completely, and many variables can affect this: temperature, humidity, how well you mixed it, how it was applied, etc.
You’ve done all of the hard work. Now is the time to be patient and give yourself the best chances of long-term success.
The best practice is to wait SEVEN full days before adding water.
Enjoy Your Cold Plunge!
Where to Buy
You can find Pond Shield in local big box hardware stores. If you use my Amazon Affiliate Link below, it doesn’t cost you any more and I earn a small commission that helps me support our global cold plunge community and my family.
Pond Shield
Self Etching Primer
Other Options
Pond Shield is available through Amazon and other resellers in many countries.
There are other 2-part epoxy resin products out there. If you choose to use one, make sure that it is suitable for a cold plunge, safe for you, and compatible with whatever method you use for sanitation.
In one of my early experiments, I spent around $400 on a 2-part pond coating epoxy resin and $400 to have it professionally applied, only to find out that is was not compatible with ozone.
Make sure that after it cures it will not leech toxic chemicals into the water. If it is rated or certified to be safe for aquatic life or used in pools/spas, it should be fine for your cold plunge.
So far, we have good reports from people in Australia using Shimicoat Swimming Pool 2-part Epoxy Resin.
Single-part resins and paints are not suitable.